Welcome back, my aspiring cyber warriors!
The Domain Name System or DNS is one of those network protocols that makes the world go round. Without it, we would need to remember innumerable IP addresses just to navigate to our favorite web sites. Imagine trying to remember the IPv4 (32-bit) addresses of Facebook, Amazon and Hackers-Arise, just to visit each of those critically important web sites (only made worse by IPv6 128-bit addresses).
DNS was designed to translate a domain name–something people are rather good at remembering–into an IP address, the language of Internet Routing. Think of DNS as simply a translation of a domain name to their respective IP addresses. So, when you enter a domain such as www.hackers-arise.com into your browser, it is translated into a computer-friendly IP address (23.236.62.147 ) that the Internet can understand and route.
In this tutorial on DNS, we examine;
I. How Domain Names work
II. How DNS works,
III. A Packet-level Analysis of DNS requests and responses,
IV. Vulnerabilities and security in DNS,
V. Build your own DNS server in Linux.
I. Domain Names
Domain names must be registered with ICANN (Internet Corporation for Assigned Names and Numbers) usually through an intermediary such as VeriSign or GoDaddy. Top Level Domains or TLD’s include .com, .edu, .org and many others that we typically seen at the end of Full Qualified Domain Name (FQDN).
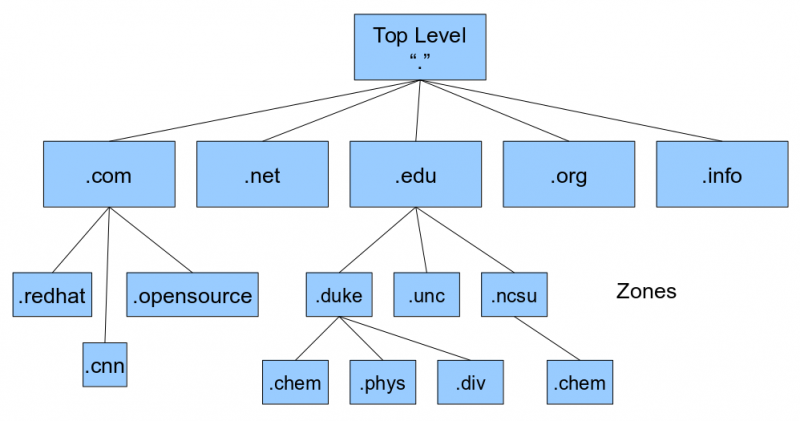
DNS works in a hierarchical manner. The Top Level Domains or TLD’s can have multiple sub domains under them. In the diagram above, both .redhat and .cnn are part of the Top Level Domain .com. A sub domain is a domain that is part of larger domain. In this example, redhat and cnn are often just referred to as the domain in common parlance, but are actually the Second Level Domain or (SLD) under .com.
Then, beneath these SLD’s or commonly referred to domains, we many subdomains. For instance, within and beneath .redhat, we might have sales.redhat, engineering.radhat, development.redhat. This is a method of subdividing the domain. The left most portion is always the most specific, while the right most is most general.
a. Fully Qualified Domain Name
A fully qualified domain or FQDN is what many people refer to as absolute domain name. A Full Qualified Domain Name (FQDN) specifies its location from the absolute root of the DNS system.
Now that we have a basic understand of domain names, the next issue in understanding how DNS is how do we translate domain names to IP addresses. Initially, clients used a simple hosts file on each client.
b. Host Files
When the Internet was very, very small (in a universe far, far away…), the association of domain names with IP addresses could fit into single text file (ARPANET, the predecessor and prototype of the internet had just 4 sites) . This single text file was then and now referred to as a hosts file. As the Internet grew larger, this hosts file proved inadequate. It was neither large enough and nor could it be constantly updated as new domains were registered and old ones left or changed. Despite this, your system still probably still a has a hosts file.
On your Kali Linux system, your hosts file is located in the /etc directory as seen below. You can open it by entering;
kali> mousepad /etc/hosts
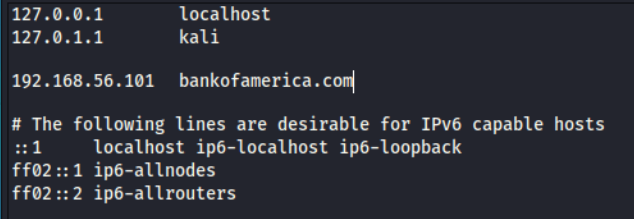
Note that each IP address is on the same line as the associated host, in this case localhost or Kali. Whenever you enter localhost in your browser, it translates it to your “home” IP or 127.0.0.1.
On the fourth line of my hosts file here, you will see an association of the private IP address 192.168.1.114 to the domain bankofamerica.com With this hosts file in place, whenever I enter www.bankofamerica.com in my browser, I would be directed to the IP address 192.168.56.101, rather than the actual IP address of Bank of America at 171.159.228.150.
I can test this also by pinging bankofamerica.com.

As you can see above, when I then try to ping www.bankofamerica.com, my ping is directed to the address associated with bankofamerica in my hosts file. The hosts file takes precedence over DNS queries. This can be a key bit of information when attempting to do DNS spoofing on a LAN (see below).

This is how DNS was operated when the Internet was very, very small.
II. How DNS Works
Now that the Internet contains billions of IP addresses and FQDN, the host file is woefully inadequate. Enter DNS. First developed by Paul Mockapetris (now in the Internet Hall of Fame) in 1983, DNS is both distributed and dynamic, unlike our hosts file.
DNS does not rely upon one file or one server, but instead upon many files across many server across the globe. These servers are organized in a hierarchical manner. Due to this distributed nature, the DNS system is resistant to outages of one or many of these servers.
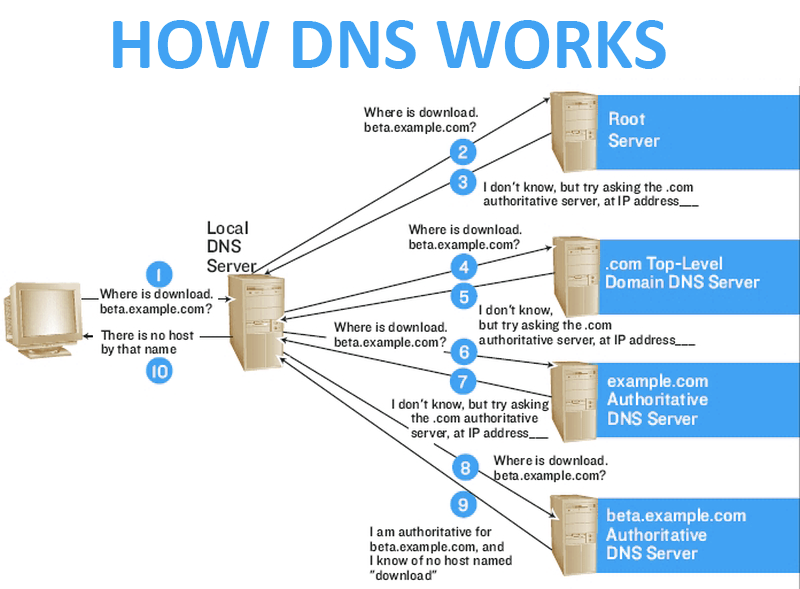
As we can see in the diagram above, the user asks (queries) the local DNS server to access download.beta.example.com. The local DNS server does not have that resource as it is new. It then queries the root server. The root server responds “I don’t know” but refers the local DNS server to the IP address of the authoritative server for the top-level domain (TLD), in this case .com. The local DNS server will then query the TLD server for .com and it will respond with the authoritative server for the domain, in this case example.com. The local DNS server will then query the authoritative server for beta.example.com. If it has the record, it will return the resource (IP address) and if not, it will respond it “doesn’t know”.
a. DNS Components
The DNS service has four (4) components;
1. DNS Cache
2. Resolvers,
3. Name servers,
4. Name space.
1. DNS Cache
This term is often confused as it has at least two meanings. First, DNS cache can be the list of names and IP addresses that you have already queried and have been resolved and are cached for you so that no network traffic is generated to resolve them (and much quicker). The second meaning regards a DNS server that simply performs recursive queries and caching without actually being an authoritative server itself.
2. Resolvers
Resolvers are any hosts on the Internet that need to look up domain information, such as the computer you are using to read this website.
3. Name Servers
These are servers that contain the database of names and IP addresses and serves DNS requests for clients.
4. Name Space
Name space is the database of IP addresses and their associated names.
b. Zone Files and Records
Every DNS zone has a zone file. This zone file may be thought of as DNS database.
These zone files have one or more resource records. These DNS records must be periodically be updated as new domains are added, changed and others dropped. Without this process, the system would remain stagnant and eventually be completely out of date. Therefore, it is essential that DNS server be capable of zone transfers.
1. Resource Records
Resource Record is a single record that describes just one piece of information in the DNS database. These records are simple text lines such as;
Owner TTL Class Type RDATA
Each of these field must be separated by at least one space.
2. Common Resource Record Types
SOA Records
The Start of Authority, or SOA, record is a mandatory record in all zone files. It must be the first real record in a file (although $ORIGIN or $TTL specifications may appear above). It is also one of the most complex to understand. The fields includes the primary name server, the email of the administrator, the domain number and timers for refreshing the zone.
NS Records
NS or name server identifies the authoritative DNS server for the zone.
A Records
The A (Address) record is used to map a domain or subdomain to an IPv4 address. For instance, hackers-arise.com points to 23.236.62147.
AAAA records point to an IPv6 record.
CNAME (Canonical) records
The CName or canonical name maps one domain or subdomain to another domain name.
PTR records
PTR Records are used in reverse DNS records (i.e. from IP address to hostname). PTR or Pointer points to a canonical name and just the name is returned in the query. You might think of these as the reverse of A or AAAA records.
MX Records
The MX record directs mail to a specific a mail server responsible for accepting of mail in the zone. Like CNAME, the MX record must always point to a domain and never an IP address.
III. Packet Level Analysis of DNS Queries
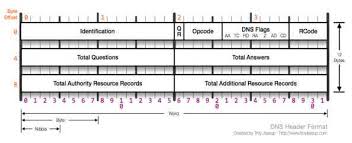
The DNS protocol, like other communication protocols our networks use, has a standard packet structure. It’s fairly simple and you can view it below without going into great detail here.
If we capture DNS queries with Wireshark, we should see something like the capture below. Notice that a DNS query is sent from the client and the DNS response comes from the DNS server.
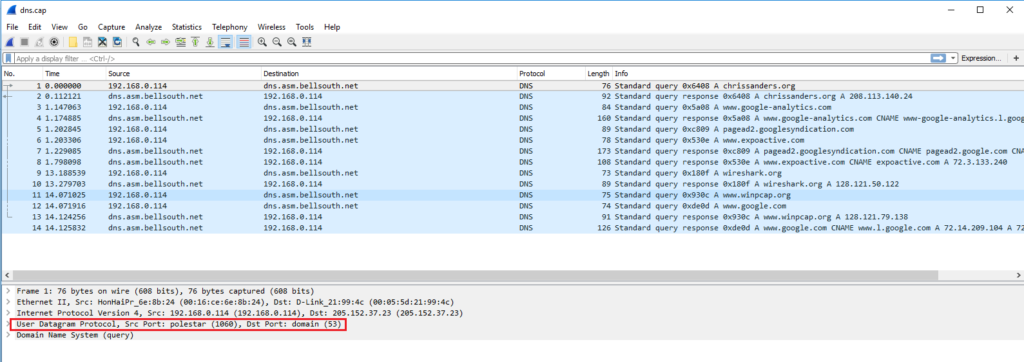
It’s also important to note that these queries use UDP and not TCP (zone transfers use TCP).
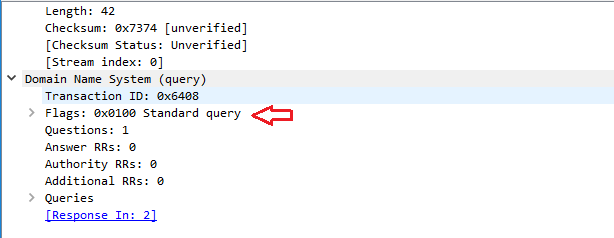
If we expand the DNS packets, we can see that they come in two varieties, Standard Query as seen below…
…and a Standard Query Response as seen here.

IV. DNS Security and Vulnerabilities
The Domain Name Service was once very fragile and vulnerable to attack. Over the years the system has been hardened and attacks are more infrequent, but still occur. In some cases, the hackers/attackers can simply harvest information from the DNS servers on the target such as DNS scanning and DNS recon (see Abusing DNS for Reconnaissance).
On local area networks (LAN) it may be possible to spoof DNS with tools such as dnsspoof to send client traffic to a local system of hacker’s choice. For instance, the attacker could send all the banking traffic to their malicious site and harvest credential there.
A. DNS Vulnerabilities
Although among the most malicious attacks on DNS would be changing your DNS server (A Record) and changing where your client is taken when requesting a website, these are increasingly rare, but not unheard of (see Iranian DNS attacks below). Increasingly, successful attacks against DNS are Denial of Service (DOS) attacks.
While on most systems and protocols, DoS attacks are an inconvenience, with such an essential service as DNS, a DoS attack can be crushing. Imagine if your business’ or ISP’s DNS server went down. Although the Internet would still be functioning (you could ping any IP address), you would not be able to connect to any sites without entering their full IP address (or change your DNS server).
If we view the list of BIND (a Linux implementation of DNS) vulnerabilities in the CVE database, we can see the vast majority of the vulnerabilities in recent years are DoS attacks.
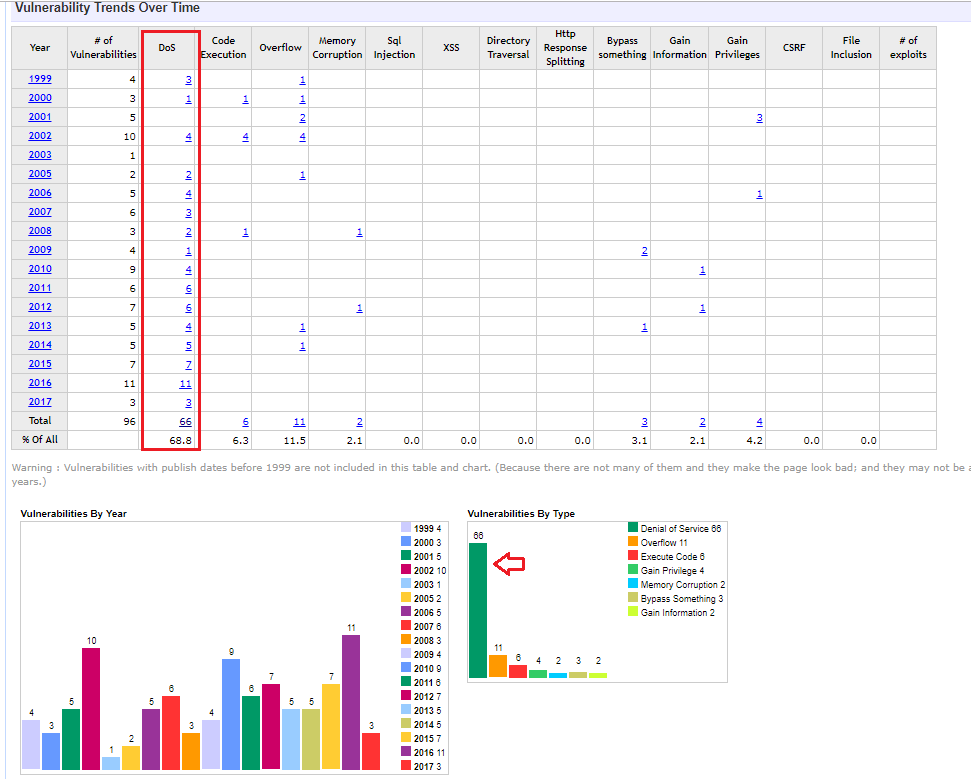
Among the most malicious DNS attacks would be the zone transfer. A zone is the data that maps IP addresses to domains. If an attacker can change that information on a DNS server, even Internet traffic would be re-directed to their website causing all types of mischief.
B. Changing DNS Server Settings
Another type attack against the DNS system would be to simply change the setting that directs the DNS queries to another malicious DNS server. In a way, this really isn’t technically an attack against DNS, but rather an attack against internal credentials and servers, such as the mail server. You can read below the details of an attack U.S. CERT warned against in early 2019 where credentials of the sysadmin (or other user with authority to change DNS records) and redirect users DNS queries to their malicious DNS Server.

Recently a group of Iranian hackers were able to attack the DNS of multiple companies in order to harvest credentials. They did this in at least 3 different ways;
1. Attackers change DNS records for victim’s mail server to redirect it to their own email server. Attackers also use Let’s Encrypt certificates to support HTTPS traffic, and a load balancer to redirect victims back to the real email server after they’ve collected login credentials from victims on their shadow server
2. Same as the first, but the difference is where the company’s legitimate DNS records are being modified. In the first technique, attackers changed DNS A records via an account at a managed DNS provider, while in this technique attackers changed DNS NS records via a TLD (domain name) provider account.
3. Sometimes also deployed as part of the first two techniques. This relies on deploying an “attacker operations box” that responds to DNS requests for the hijacked DNS record. If the DNS request (for a company’s mail server) comes from inside the company, the user is redirected to the malicious server operated by attackers, but if the request comes from outside the company, the request is directed to the real email server.
C. DNS Security or DNSSec
DNS by default is NOT secure. DNS can be easily spoofed due to the fact that DNS is based on UDP, which is not connection-oriented. DNSSEC or DNS Security Extensions was developed to strengthen the authentication in DNS by using digital signatures.
Every DNS zone has a public/private key. Any recursive resolver that looks up data in the zone, also retrieves the zone’s public key which can used to validate the authenticity of the data.
Before DNSSec, it was possible for malicious actors to execute zone transfers on DNS servers. This would poison the data making it unreliable. DNSSEC prevents this by;
1. Cryptographically verifying that the data it receives actually comes from the zone it believes it should come from;
2. Insuring the integrity of the data so that the data can’t be altered enroute as the data must be digitally signed by the private key of the zone.
V. Implementing DNS (BIND) in Linux
Now that we understand the basics of how DNS works and how attackers might use DNS in their attacks, let’s set up a DNS server in our Linux system. BIND or Berkeley Internet Domain System is commonly used on Linux systems, is the most widely used DNS server on the Internet and is among the best DNS systems.
Although setting up and configuring a BIND server is profession in itself, here we will attempt to set a simple, basic BIND server on our local area network (LAN) to help you understand the functioning of these servers.
1. First, let’s download and install bind9 from the repository.
kali > apt-get install bind9
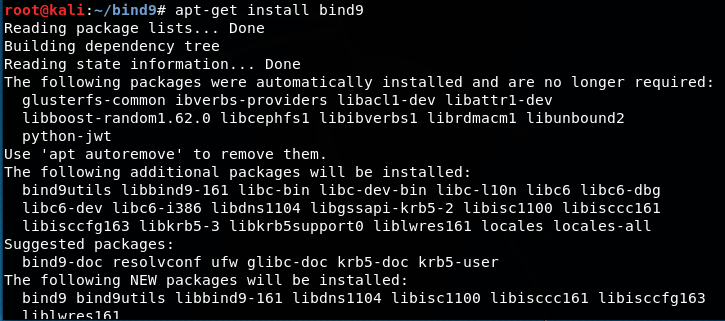
If bind9 is not in your repository, you can get it directly from ISC.org reposority using git clone.
kali > git clone https://gitlab.isc.org/isc-projects/bind9.git

2. Next, let’s open the configuration file for BIND at /etc/bind/named.conf.options (all configuration files for BIND are located at /etc/bind).
kali > leafpad /etc/bind/named.conf.options
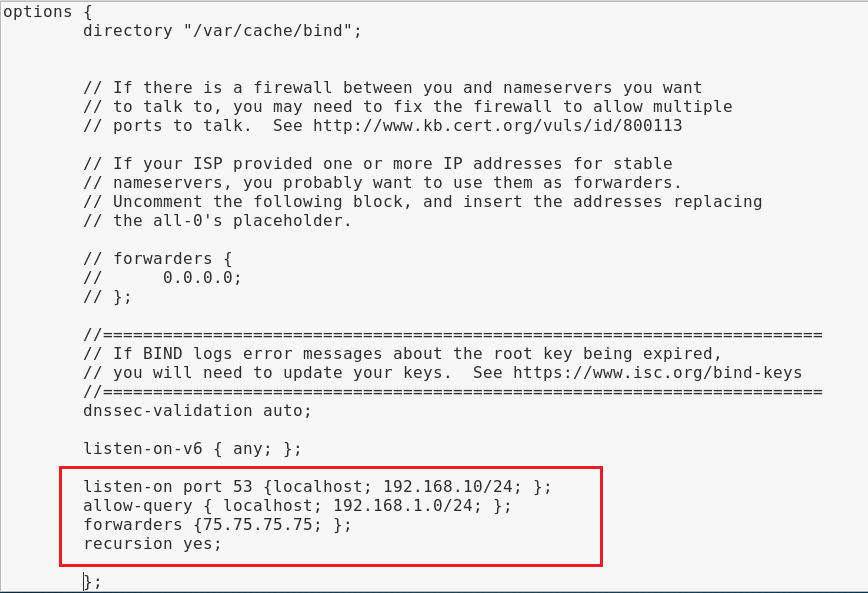
As you can see, we edited the highlighted paragraph to;
listen on port 53 from localhost and our local area network on 192.168.1.0/24;
allow-query on localhost and 192.168.1.0/24
use forwarder at 75.75.75.75 (where to forward DNS requests when your DNS server can’t resolve the query)
and enable recursion.
3. Next, let’s open named.conf.local. This is where we define the zones files for our domain.
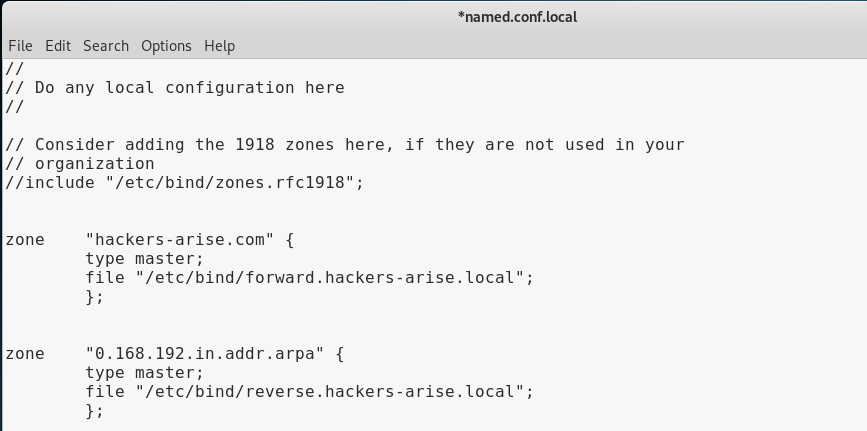
Note that we defined the locations of our forward and reverse lookup zone files. Now, we need to create these forward and reverse zone files.
Let’s navigate to the /etc/bind directory. There you will see a file named db.local. This is a template for our fowarder file. Let’s copy it to a file named forward.hackers-arise.local.
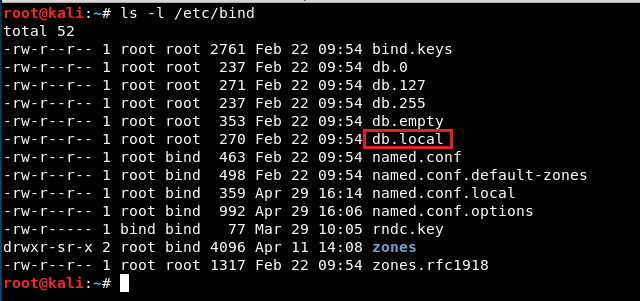
kali > cp db.local forward.hackers-arise.local
kali > leafpad /etc/bind/forward.hackers-arise.local
Let’s open this file in leafpad and make a few changes by specifying our domain (hackers-arise.com), the IP address of our DNS server (192.168.1.27), our mail server and finally the IP addresses of the web server and email server.
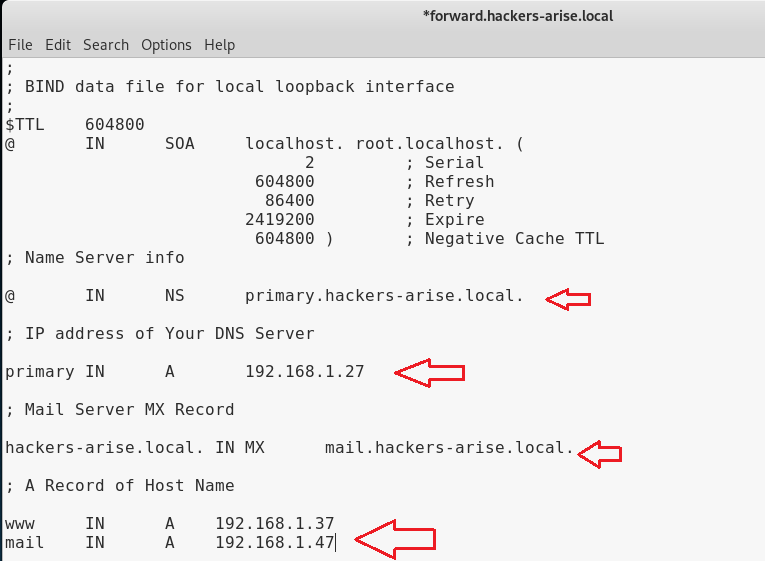
Now, we need to create a reverse lookup file. Once again, we have a template in the /etc/bind directory. In this case, it’s named db.127. Let’s copy it to reverse.hackers-arise.local.
kali > cp db.127 reverse.hackers-arise.local
Then, let’s open that file with leafpad.
kali > leafpad /etc.bind/reverse.hackers-arise.local
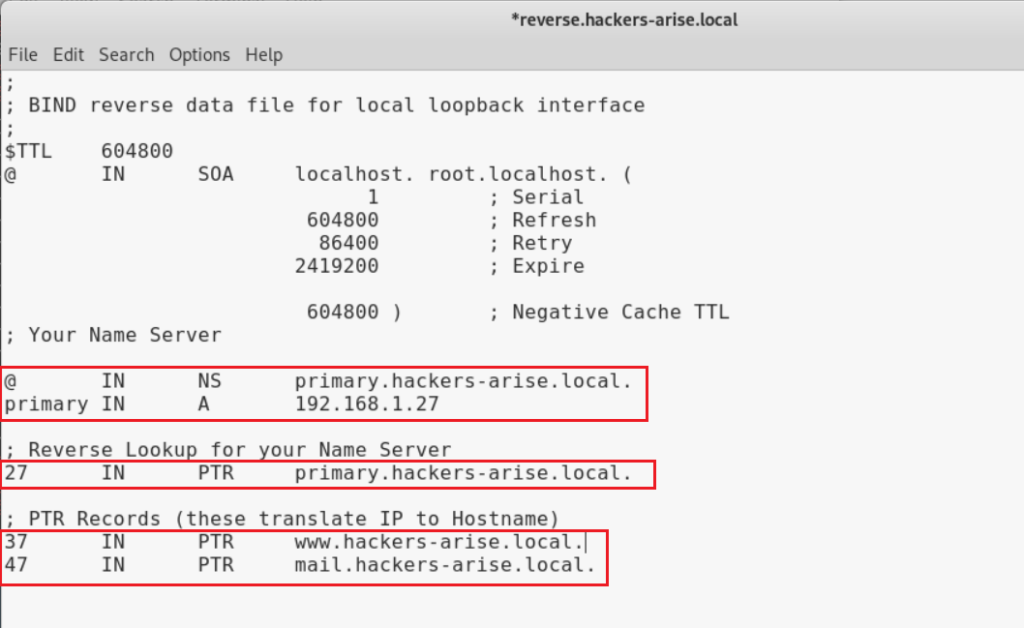
Let’s now make a few changes.
Under “Your Name Server” add;
primary.your domain.local.
The IP address of the name server
Under “Reverse Lookup” add;
the last octet of the IP address of the NS and primary.your domain.local.
Under “PTR Records” add;
the last octet of the webserver and www.your domain.local
the last octet of the mail server and mail.your domain.local.
4. In our final step, we just need to restart the service for our changes to be captured and implemented.
kali > service bind9 restart
For those of you prefer the new systemd commands, this works just as well.
kali > systemctl restart bind9
Now, our BIND server is ready to resolve DNS queries on our local area network!
Summary
DNS is among the most essential communication protocols for smooth functioning of your internet access translating human readable domain names to router readable IP addresses. There have been number of security threats to DNS including stealing DNS admin credentials and changing zone files and Denial of Service (DoS) attacks.
Look for Master OTW’s new book “Network Basics for Hackers” coming on December 2022. You can pre-order it at 50% off!


