Welcome back, my aspiring cyber warriors!
Reverse engineering malware is among the highest-level skill sets in our discipline and it’s salaries reflect elevated position in the cyber security ecosystem. It requires years of diligent study to become proficient and this is good place to start. If you have not yet done so, go back and read the following tutorials here at Hackers-Arise.
Reverse engineering malware is used throughout cyber security as a method of unlocking the secrets of the functioning of the malware and providing clues to attribution.
When we left off in the first installment of this series, I had introduced you to Ghidra, the open-source, reverse engineering tool released by the US spy agency, National Security Agency, better known as the NSA. In this tutorial, we will begin to use it to crack some simple software to help familiarize you to this excellent tool. As we move through this series, we will progress to ever increasingly more complex software.
Step #1 Open Ghidra
The first step, of course, is to start Ghidra, start a project and open a file. If you have forgotten, go back to Ghidra #1 here. Make certain to download and open the series of crackme’s (These simple crackme’s are available at https://github.com/Maijin/radare2-workshop-2015/tree/master/IOLI-crackme).

Step #2 Find the Exports
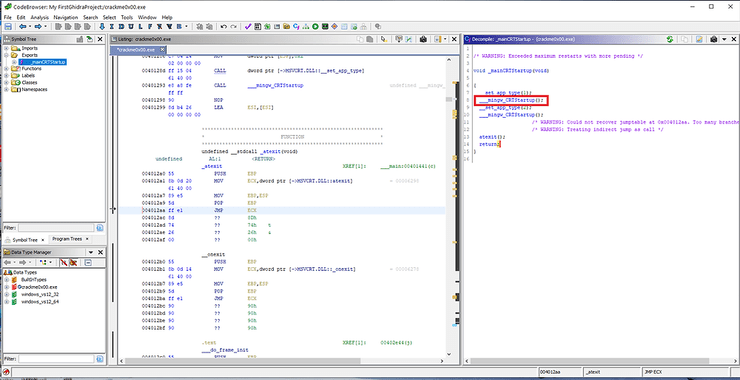
The next step is to go to the Symbol Tree as seen below and expand the exports (remember, exported functions are the modules exposed to other modules for their own use. To use these functions that other modules export, a module must import them first).
You should find a single function there labelled _mainCRTStartup.

When you click on it, it will open its code in the Decompile window like below.

Note that we can identify the main function about 80% down the length of the code or line #32
Step #3 Click On and Expand the _main function
Now, let’s click on that main function again to reveal its code in the decompiler.

As you can see above, there are a couple of print statements that we saw when we executed this code in Windows.


Below the print statements, we see a scanf statement. This scans for the user input from the keyboard and places it into a variable named “local_lc“.

On line #14, the code does a string comparison (_strcmp) of the string variable captured in Line #13 and compares it to a number. This number is presumably the valid password. The string comparison command will return a 0 if the two strings are the same and a 1 if they are different. This value will be placed into variable labelled “iVar1” which was declared as a integer variable in line #5 (int iVar1).

In the next section (lines 15-22), the code checks whether the value in iVar1 is equal to 0 or 1. If it is equal to 0, it prints “Password OK :” and authenticates the user. If it is equal to 1, it prints “Invalid Password!” and prevents the user from progressing to the underlying application.
Summary
Ghidra is capable of disassembling this simple crackme and enable us to uncover the password within the code. We will next disassemble increasingly more difficult software and use the capabilities of Ghidra to reveal their secrets!


